
At the best of times kids don’t have more than a few minutes of concentration when instructions are being given at the start of rugby practice so you as a coach need to ensure the following:
1.Get to the field at least 20 minutes before training and set the field up so you don’t waste time during your session and give players the opportunity to run riot while you are laying out cones etc.
2.Create a game for the start of practice, when you blow the whistle signalling the start of training players have 20 seconds to ‘circle up’ and form a ring around you, if they take longer they have to do 10 push ups. This gets the players attention and sets the tone for training. MAKE IT FUN NOT PUNISHMENT.
3.Give the players a short explanation of what they going to be doing that day, no longer than 2min.
4.Use ‘count downs’ before each drill so players react and don’t have time to monkey around.
5.Repetitions create habit, try to use the same simple warm up like the one below at every session that focuses on core skills so the players can develop by repeating the same drills over and over.
This basic session has been put together to assist in teaching you how to structure a FUN & SAFE warm up that harnesses the enthusiasm these aspiring future rugby stars have for the game and channelling it into well instructed drills that will create a foundation so they can fully enjoy playing the game.
Remember quality not quantity, you should rather master a few basic skills and drills with your players than overload them. The key is to warm the players up with ball in hand so they don’t get bored, a young players eyes always light up when they have a ball in their hands.
A. THE WARM UP
Please don’t send the kids around the poles 3 times to start practice this will have little if no benefit to them.
Ideally the warm up is used to prepare muscles for action and specifically for rugby. You need to choose rugby specific activities and dynamic movements that will assist in making the players “rugby ready” and minimize the risk of injury. Don’t have the players stand or lie around doing static stretches they need to be doing the opposite, they need to ‘warm up on the move’ as they are about to start running around so static stretching holds little benefit for becoming “rugby ready”.
The warm up should be a combination of the rugby grid and the group skill & drills, alternate between them like this:
A. 2 Laps of the rugby grid per player @ 50% max effort.
B. 2 min of group ball skill @ 60% max effort.
C. 2 Laps of the rugby grid per player @ 70% max effort.
D. 2 min of zig-zag ball race @ 80% max effort.
E. 2 Laps of the rugby grid per player @ 90 – 100% max effort.
± Time = 10 minutes

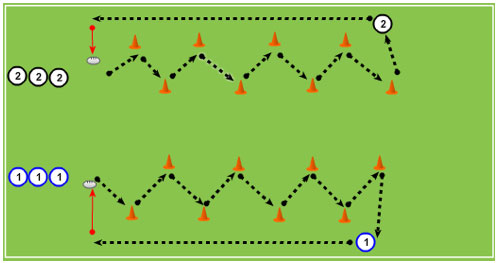
RUGBY GRID
1. Zig zag around cones.
2. Two hops over obstacles.
3. Catch and pass from coaches.
4. Run; side shuffle left; run; side shuffle right; run
5. Turn corner and run to finish cone.
B. GROUP BALL SKILL
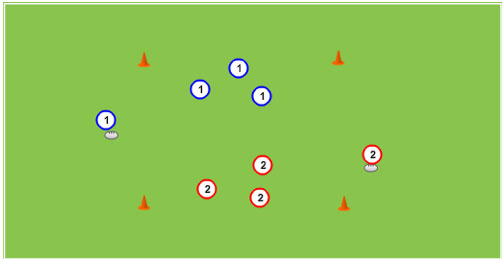
Equipment and set-up.
• Cones & Balls, organise students and equipment as shown in diagram (below).
How to play
• Organise the players into small groups of 4 or 5. The leader holds a ball.
• On coaches call the leader runs out to the 5m mark turns and passes back to the next player in line, then returns.
Teaching points
• Hold the ball in two hands when running.
• Step towards the player they are passing to when delivering the pass.
• Follow through with your arms after you pass.
Variations
Instead of passing the ball back instruct the players to perform one of the following:
• Roll Ball – rolling the ball back to the next player who must collect the ball by their bending knees and scooping the ball with both hands.
• Jump Ball – the returning player must deliver a pass up above the waiting players head who in turn jumps up and collects the ball.
• Belly Ball – the returning player must present the ball with one hand so that the next player can run onto the ball with a slightly leaning over body position and must collect the ball with both arms into the belly.
C. ZIG ZAG BALL RACE
Divide players into equal-sized teams of three to four player’s. The first player runs through the obstacle course, dodging the markers, while holding the ball in both hands. At the end, the player sprints straight back to the waiting line and transfers the ball to the next player. Players have turns continuously.
Teaching points
• Carry the ball in two hands at all times.
• Use ‘soft hands’ control the ball in fingertips.
Variations
• Players roll the ball around their bodies while running.
• Teams race each other.
BONUS DRILL:
Use this drill in place of the zig-zag race to mix it up some practices.
FLY SWAT
Divide the group of players into two groups and in each group choose a ‘swatter’ per four players. Then spread the ‘swatters’ out on the edge of the grid with a rugby ball. The rest of the players are spread out inside the grid. On the coaches command the ‘swatters’ enter the grid and ‘swat’ as many fly’s (players) as possible in a set time frame by pressing the ball against them with out letting the ball go. The ‘swatters’ must count their fly squashes aloud as they go. Change the ‘swatters’ after each round and the winner is the one with the most number of swats!
Teaching points
• Use fast feet and short explosive steps.
• Evade the swatters by continuously changing direction.
• Keep head up and try not to collide with other players.
Variations
• Increase or decrease the area of the grid.
• Increase or decrease the time allowed.
• Once you are tagged you become a tagger.
• Once you are tagged you sit on the outside of the grid.
IMPORTANT! The warm down at the end of practice is just as important as the warm up. Explain to the players that an important aspect of any physical activity is cooling down and stretching. The warm down should comprise of light cardio and mild stretching i.e. slow jog followed by a simple stretch routine.